The Scientific Method in Practice: A Complete Step-by-Step Guide (With Examples)
Learn how to apply the scientific method from scratch: observation, hypothesis, experiment, and conclusion. A practical guide with real examples to finally understand it.
The Scientific Method in Practice: A Complete Step-by-Step Guide
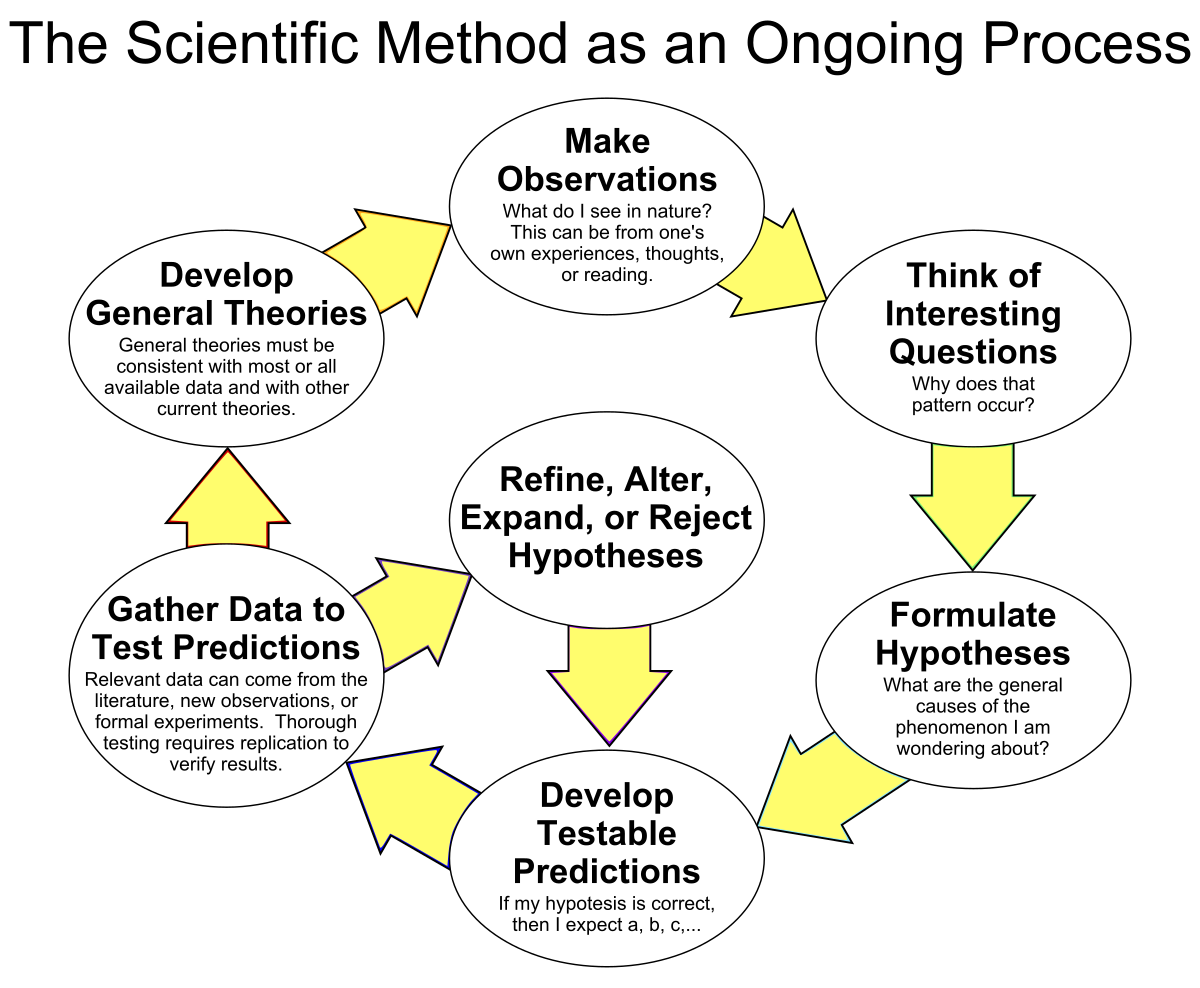
The scientific method is a systematic 6-step process used to investigate phenomena and discover the truth: observation → question → hypothesis → experiment → analysis → conclusion. Sounds complicated? Relax — you already use this without realizing it when you try to figure out why your plant is dying or why your coffee tasted bad.
I decided to create this guide because I realized many people think “science” is something distant, something that only happens in laboratories, full of formulas. But it isn’t. The scientific method is simply an organized way of thinking and solving problems. And the more I studied it, the more I realized how useful this process is in everyday life.
I’ll show you each step of the scientific method in a practical way, with examples that actually make sense. Consider this my study note — and now it’s yours too.
Why does the scientific method exist?
Before getting into the step-by-step process, I need to give some context: the scientific method exists to protect us from guesswork.
Think about it: how many times have you heard someone say “I’m sure it works like this” without having tested anything? Or “everyone knows that…”? The scientific method is the exact opposite of that. It’s about testing, measuring, observing, and only THEN drawing conclusions.
The idea is simple: if you follow an organized process, your chances of discovering the truth increase A LOT. And best of all, you can prove (or disprove) your ideas objectively.
The 6 steps of the scientific method
I’ll break this down into very clear stages. Each one has a specific role, and skipping any of them is asking to reach the wrong conclusions.

Step 1: Observation
Everything starts here — you notice something interesting or unusual in the world around you.
An observation can be anything:
- “My living room plant is wilting, but the one in the kitchen looks great”
- “Whenever I drink coffee after 4 p.m., I sleep poorly”
- “My phone battery drains faster when I use GPS”
The secret of good observation: be specific. It’s not enough to think “my plant is bad.” Observe WHEN it happens, WHERE, and under what CONDITIONS.
Practical example I’ll use throughout this guide:
Observation: “I noticed my homemade bread turns out flat when I bake it on Sundays, but fluffy when I bake it on Tuesdays.”
Step 2: Question
Now that you’ve observed something, it’s time to turn that observation into a clear question.
This question needs to be:
- Specific (no vague “why are things like this?”)
- Testable (you must be able to investigate it)
- Focused on ONE thing at a time
Bad question: “Why doesn’t my bread turn out right?”
Good question: “Does room temperature affect how my bread rises?”
In my example:
Question: “Why does my bread turn out flat on Sundays, but fluffy on Tuesdays?”
See the difference? The second question already gives you direction.
Step 3: Hypothesis
Here you create a temporary answer to your question — an educated guess based on what you already know.
A good hypothesis:
- Is testable
- Is specific
- Is based on logic or prior knowledge
Classic format: “If [I do X], then [Y will happen], because [explanation Z].”
In the bread example:
Hypothesis: “If the temperature in my kitchen on Sundays is lower than on Tuesdays, then the yeast won’t work properly and the bread will turn out flat, because yeast needs warmth to activate.”
Notice I’m not certain. It’s a hypothesis, not a conclusion. Now I need to test it.
Step 4: Experiment
This is the most important part — you will test your hypothesis in a controlled way.
The key concept here is variables:
Independent variable: what YOU deliberately change
Dependent variable: what YOU observe changing
Controlled variables: everything you keep the SAME to avoid interference
In the bread experiment:
- Independent variable: kitchen temperature
- Dependent variable: bread height/texture
- Controlled variables: same recipe, same amount of yeast, same oven time, same flour brand
How to do it:
- Bake bread at 4 different temperatures (18°C, 22°C, 26°C, 30°C)
- Measure temperature with a thermometer
- Bake 3 loaves at each temperature (to rule out luck)
- Record EVERYTHING: bread height, texture, rise time
Important tip: If you change too many things at once, you won’t know what caused the result. Change ONE thing at a time.

Step 5: Data Analysis
Now you organize and interpret the results of your experiment.
This can include:
- Tables
- Charts
- Averages
- Pattern recognition
In my case:
| Temperature | Average bread height | Texture | Notes |
|---|---|---|---|
| 18°C | 8 cm | Dense | Rose very slowly |
| 22°C | 12 cm | Good | Normal rise |
| 26°C | 15 cm | Fluffy | Fast and even rise |
| 30°C | 13 cm | Irregular | Rose too fast, collapsed |
What I notice:
- Low temperature (18°C) = flat bread ✓
- Ideal temperature seems around 26°C
- Too much heat is also bad
So my hypothesis was partially correct.
Step 6: Conclusion
Finally, you answer the original question based on the data.
Your conclusion can be:
- Hypothesis confirmed
- Hypothesis rejected
- Hypothesis partially confirmed
My conclusion:
“Kitchen temperature really affects how bread rises. On Sundays my kitchen is around 19°C (colder weather), which makes the bread flat. On Tuesdays it’s around 25–26°C and the bread turns out perfect. To fix this, I can warm the kitchen slightly or let the dough rise inside the oven with the light on.”
And if the hypothesis were WRONG? That’s fine. Being wrong is part of science.
The scientific method is a cycle
One thing I learned: the scientific method never truly ends.
Every conclusion generates new questions:
- “Okay, 26°C is ideal, but for how long?”
- “What if I use biological yeast instead of chemical?”
- “Does altitude matter too?”
It’s like solving a puzzle where every piece reveals new missing pieces — and that’s the fun part.
Everyday examples of the scientific method
Example 1: Wilting plant
- Observation: Leaves are turning yellow
- Question: Why are the leaves yellow?
- Hypothesis: If it’s lack of water, watering more will help
- Experiment: Water twice a week instead of once
- Analysis: After 3 weeks, still yellow
- Conclusion: Not lack of water — new hypothesis needed
Example 2: Bad coffee
- Observation: Coffee tastes bitter
- Question: What makes coffee bitter?
- Hypothesis: Less coffee will reduce bitterness
- Experiment: Test different ratios
- Analysis: Weaker, but still bitter
- Conclusion: Not quantity — maybe extraction time
Common mistakes when using the scientific method
- Confirmation bias — only looking for evidence that supports what you already believe
- Small samples — testing only once
- Poor variable control — changing many things at once
- Jumping to conclusions — skipping tests
Why does this matter?
Because the scientific method teaches you to think critically about everything.
It gives you a built-in bullshit filter.
Final summary
Scientific method = Observe → Question → Hypothesize → Test → Analyze → Conclude
Be honest with the data. If you’re wrong, great — you learned something.
Sources and further reading: